Clothing Photo Editing to Boost Sales in 2025: Unlock Success!
Why Editing Matters for Clothing Product Photos
In today’s online shopping environment, having well-edited photos is crucial for capturing your audience’s attention and driving sales. High-quality images not only present your products in the best light but also build trust with potential customers. Studies show that approximately 93% of buyers consider visual appearance to be the most important factor in their purchasing decisions. By investing time in editing your clothing product photos, you can significantly enhance their appeal and ultimately boost your sales.
Step 1: Choose the Right Software for Clothing Photo Editing
Before diving into the editing process, you need to select the right software. Popular options include:
- Adobe Photoshop: A powerful tool that offers a wide array of features for advanced users.
- Lightroom: Perfect for enhancing colors and lighting in bulk.
- Canva: A user-friendly option with drag-and-drop simplicity for beginners.
Consider your skill level and needs when making this choice. If you’re just starting, a simple tool like Canva might be ideal for you.
Step 2: Upload Your Photos
Once you’ve chosen your software, it’s time to upload your images. For optimal results, make sure to:
- Use high-resolution images to prevent pixelation.
- Select images that show your products from different angles.
Most tools make it easy to upload, so this step should be straightforward.
Step 3: Crop for a Better View
Cropping is essential to focus on the clothing item itself. Here’s how to get the most out of this step:
- Remove distractions: Eliminate any background elements that may take attention away from the clothing.
- Focus on details: Ensure that the critical features of the product are highlighted.
By cropping thoughtfully, you can create a cleaner, more appealing image that attracts customers.
Step 4: Adjust Lighting and Color
Good lighting can significantly enhance the look of your clothing. In this step, focus on:
- Brightness and contrast: Adjust these settings to make the colors pop and give your clothing a vibrant look.
- White balance: This setting helps avoid photos looking too yellow or blue. Aim for natural-looking colors that accurately represent the clothing.
For instance, if you have a bright red dress, you want that red to look vivid and true-to-life without appearing washed out or overly dark.
Step 5: Retouching for Perfection
Retouching can help remove imperfections from your images. Here are key areas to focus on:
- Removing wrinkles: Especially if you’re photographing clothing that has just come from the store.
- Fixing small flaws: These can be things like dust spots or stray threads. Clean images look more professional.
Remember, the goal is to represent your product as accurately and attractively as possible.
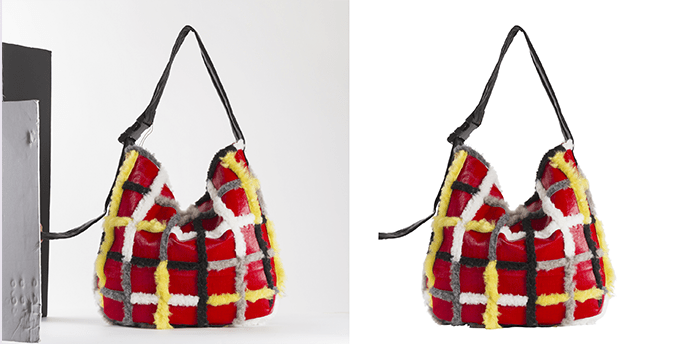
Step 6: Add Backgrounds and Shadows
Using a consistent background can elevate your images. Here are a few tips:
- Choose a simple background: White or neutral colors often work best, allowing your clothing to take center stage.
- Add shadows: Subtle shadows can create depth and make the clothing appear more three-dimensional.
This addition can help your clothing items stand out and look more realistic.
Step 7: Save in the Right Format
Finally, it’s important to save your images in the correct format. Here’s what to consider:
- JPEG for online use: The most common format for websites and e-commerce platforms.
- PNG if you need a transparent background: Useful for logos or designs overlaid on other images.
Make sure to maintain a balance between quality and file size, as heavy files can slow down your website.
Try It with Our Free Offer! for Clothing Photo Editing
At photoperfector.com, we understand that high-quality images are essential for your business. That’s why we’re excited to offer you the opportunity to experience our photo editing services—completely free! Enjoy five free edits to see just how much of a difference professional editing can make for your clothing products.
Conclusion
Editing your clothing product photos may seem daunting at first, but following these steps can simplify the process and lead to impressive results. With high-quality images, you’ll catch your customers’ eyes, build trust, and encourage purchases. So, roll up your sleeves, get editing, and watch your sales soar!