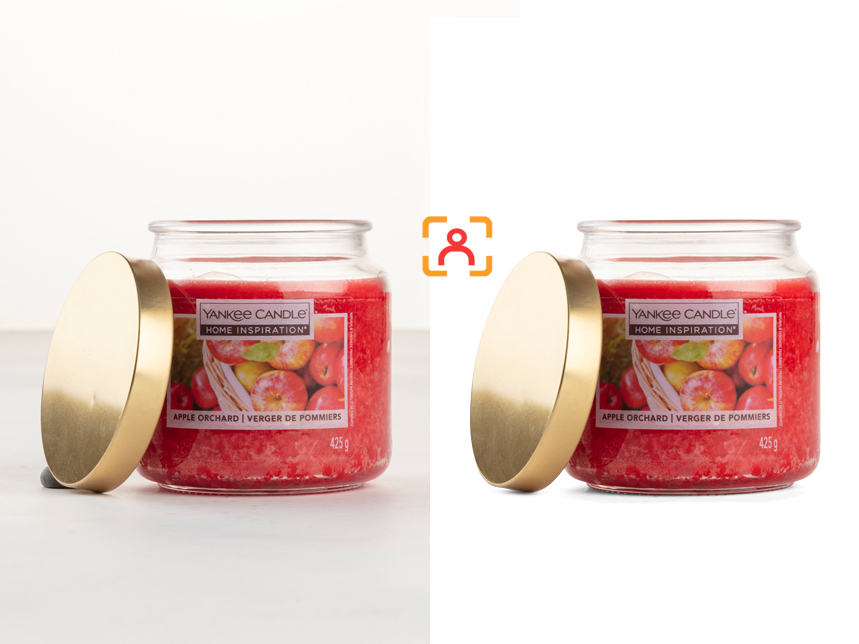
change image background to white
Have you ever taken a perfect photo, only to be disappointed by its distracting background? 😩 Whether you’re preparing product images for an online store, creating professional headshots, or simply trying to enhance your personal photos, a clean white background can make all the difference. But how do you achieve that crisp, professional look without expensive equipment or advanced editing skills?
Enter the world of digital background removal and replacement. With the right tools and techniques, you can transform any image into a polished, studio-quality shot with a pristine white background. It’s not just about aesthetics – a uniform white background can significantly improve the focus on your subject, enhance visual consistency across multiple images, and even boost your website’s loading speed. 🚀
In this comprehensive guide, we’ll walk you through everything you need to know about changing image backgrounds to white. From understanding why it’s important, to exploring various tools and techniques, to troubleshooting common issues – we’ve got you covered. Let’s dive in and unlock the secret to creating stunning, professional-looking images with ease!
Understanding the Need for a White Background
A white background is crucial for enhancing product visibility in images. It provides a neutral canvas that allows the product to stand out and become the focal point. This is particularly important in e-commerce, where clear product presentation can significantly impact sales.
| Benefits of White Background | Impact on Product Visibility |
|---|---|
| Eliminates distractions | Focuses viewer’s attention |
| Improves color accuracy | Showcases true product colors |
| Enhances details | Highlights product features |
B. Creating a clean, professional look
White backgrounds contribute to a clean and professional aesthetic, which is essential for building brand credibility. This minimalist approach:
Conveys simplicity and elegance
Aligns with modern design principles
Creates a sense of spaciousness in the image
C. Improving image consistency across platforms
Consistency is key in branding and marketing. White backgrounds offer several advantages:
Uniform appearance across different websites and social media platforms
Easy integration with various page designs and layouts
Improved adaptability for different screen sizes and resolutions
By maintaining a consistent white background, businesses can ensure their images look cohesive and professional across all digital channels, reinforcing brand identity and improving overall visual communication.
Tools for Changing Image Background
Professional software options
When it comes to changing image backgrounds to white, professional software offers powerful and versatile solutions. Here are some top options:
| Software | Pros | Cons |
|---|---|---|
| Adobe Photoshop | Advanced tools, industry standard | Subscription-based, steep learning curve |
| GIMP | Free, open-source, cross-platform | Less intuitive interface |
| Affinity Photo | One-time purchase, professional features | Less extensive plugin ecosystem |
| Corel PaintShop Pro | User-friendly, affordable | Windows-only |
Online tools and web applications
For those who prefer browser-based solutions, several online tools offer quick and easy background removal:
Remove.bg
Photopea
Pixlr
Fotor
These web applications provide convenient options for users who don’t want to install software or need occasional editing.
Mobile apps for on-the-go editing
Smartphone users can benefit from mobile apps that offer background removal capabilities:
Adobe Photoshop Express
Snapseed
Background Eraser
PhotoRoom
These apps allow for quick edits while on the move, making them ideal for social media content creators.
Free vs. paid solutions
When choosing between free and paid options, consider your needs and budget:
Free solutions: Ideal for occasional use or beginners
Paid options: Better for professionals or frequent users needing advanced features
Now that we’ve explored various tools, let’s dive into the step-by-step process of changing an image background to white.
Step-by-Step Guide to Changing Background Color
A. Selecting the right image format
When changing an image background to white, choosing the correct file format is crucial. Here’s a comparison of common image formats:
| Format | Pros | Cons | Best for |
|---|---|---|---|
| PNG | Supports transparency, lossless | Larger file size | Graphics, logos |
| JPEG | Small file size, good for photos | No transparency | Photographs |
| TIFF | High quality, supports layers | Very large file size | Print media |
| WebP | Smaller than PNG/JPEG, supports transparency | Limited browser support | Web images |
For most cases, PNG is ideal as it supports transparency, which is essential when removing backgrounds. explore here
B. Removing the existing background
To remove the existing background:
Open your image in a photo editing software
Use the “Magic Wand” or “Quick Selection” tool to select the background
Refine the selection using the “Refine Edge” feature
Delete the selected background
C. Adding a white background layer
Once the original background is removed:
Create a new layer beneath your image
Fill this layer with white using the paint bucket tool
Adjust the canvas size if necessary to fit your needs
D. Adjusting brightness and contrast
Fine-tune your image:
Use the “Levels” or “Curves” tool to adjust overall brightness
Apply the “Brightness/Contrast” adjustment to enhance details
Use the “Dodge” and “Burn” tools for localized adjustments
E. Saving the final image
To preserve your work:
Choose “Save As” and select PNG format
Adjust compression settings for optimal quality and file size
Use a descriptive filename for easy identification
Now that you’ve successfully changed your image background to white, you can move on to exploring advanced techniques for achieving perfect results.
Dealing with complex edges and hair
When changing image backgrounds to white, complex edges and hair can be particularly challenging. Here are some advanced techniques to achieve perfect results:
Refine Edge Tool: Use this tool to precisely select and adjust intricate edges.
Frequency Separation: Separate texture from color to maintain edge details.
Dodge and Burn: Enhance edge contrast for a cleaner separation.
| Technique | Best for | Difficulty |
|---|---|---|
| Refine Edge | General use | Moderate |
| Frequency Separation | Hair and fur | Advanced |
| Dodge and Burn | Fine details | Intermediate |
Handling semi-transparent objects
Semi-transparent objects require special attention when changing backgrounds:
Use layer blending modes like “Screen” or “Multiply”
Adjust opacity levels for realistic transparency
Create custom masks for precise control
Correcting color cast from original background
To ensure a clean white background, address any color cast issues:
Use Color Balance adjustment layers
Apply Selective Color corrections
Utilize the Curves tool for fine-tuning
Remember to sample the original background color and create an opposing adjustment to neutralize the cast. This attention to detail will result in a professional-looking image with a crisp, white background. With these advanced techniques, you’ll be able to handle even the most challenging image background changes with confidence and precision.
Best Practices for White Background Images

Maintaining proper lighting and shadows
When working with white backgrounds, proper lighting is crucial for achieving professional-looking results. Soft, diffused lighting helps minimize harsh shadows and creates a clean, even appearance. Consider using a lightbox or softbox to distribute light evenly across your subject.
To maintain natural shadows:
Use a fill light to soften shadows without eliminating them completely
Experiment with light positioning to create subtle depth
Avoid over-exposing the image, which can flatten the subject
Choosing the right shade of white
Not all whites are created equal. The shade you choose can significantly impact the overall look of your image:
| Shade | Effect | Best for |
|---|---|---|
| Pure white | Clean, stark | Product photography |
| Off-white | Softer, warmer | Lifestyle images |
| Cool white | Modern, crisp | Tech products |
Consider the following when selecting a white shade:
Match the white to your subject’s undertones
Ensure consistency across a series of images
Test different shades to find the most flattering option
Ensuring consistent image sizes
Maintaining consistent image sizes is essential for a cohesive look, especially when showcasing multiple products or creating a gallery:
Establish a standard aspect ratio (e.g., 1:1 for square images)
Set a fixed canvas size for all images (e.g., 1000×1000 pixels)
Use guides or templates in your editing software to maintain consistency
Crop images uniformly, leaving appropriate padding around subjects
By following these best practices, you’ll create professional-looking white background images that enhance your visual content and maintain a polished, consistent appearance across your portfolio or product catalog.
Troubleshooting Common Issues
When changing an image background to white, jagged edges can be a common issue. To fix this:
Use the Feather tool: Apply a slight feather to your selection before removing the background.
Refine Edge feature: Utilize this tool to smooth out rough edges and create a more natural transition.
Manually clean up: Zoom in and use a small brush to touch up any remaining jagged areas.
| Technique | Pros | Cons |
|---|---|---|
| Feather tool | Quick and easy | May lose some detail |
| Refine Edge | Precise control | Time-consuming |
| Manual cleanup | High accuracy | Labor-intensive |
Addressing color bleeding
Color bleeding occurs when the original background color seeps into the edges of the subject. To address this:
Use Color Range selection: This tool can help isolate problematic areas.
Adjust Hue/Saturation: Target specific color ranges to neutralize bleeding.
Clone Stamp tool: Carefully clone nearby white areas to cover bleeding spots.
Correcting overexposure
Overexposure can happen when adjusting contrast to achieve a pure white background. To correct this:
Use Levels or Curves: Fine-tune the image’s brightness and contrast.
Apply a Gradient Map: This can help balance overexposed areas.
Selective adjustments: Use layer masks to apply corrections only where needed.
Remember, patience and attention to detail are key when troubleshooting these issues. With practice, you’ll develop an eye for spotting and correcting these common problems efficiently.

Changing an image’s background to white can significantly enhance its appeal and versatility. By following the step-by-step guide and utilizing the tools discussed, you can easily achieve professional-looking results. Remember to apply advanced techniques for perfect outcomes and adhere to best practices when working with white backgrounds.
As you embark on your image editing journey, don’t be discouraged by initial challenges. With practice and patience, you’ll master the art of creating stunning white background images. Whether for e-commerce, professional portfolios, or personal projects, this skill will prove invaluable in presenting your subjects in their best light.


